Remen Naruto
What is that food anime called? Cooking manga (Japanese: 料理漫画, Hepburn: ryōri manga), also known as gourmet manga (Japanese: グルメ漫画, Hepburn: gurume manga), is a genre of Japanese manga and anime where food, cooking, eating, or drinking is a central plot element. What is the most popular anime food?Here are some popular snacks that you’ve probably seen in anime and where to get them!
- Ramen: One Japanese food that has been popularized by anime is ramen.
- Melon Pan: Melon pan is another Japanese snack that anime characters often eat.
- Taiyaki: Taiyaki is a snack that shows up often in anime, and it’s easy to see why.
What is the food they eat in spirited away?
The food in Spirited Away is animated with intricate detail. Some of it is Japanese: Chihiro noshes on onigiri (rice balls) with her parents; Lin feeds konpeito (traditional, brightly colored Japanese sugar candies) to the animate soot balls; and even ishi-yaki-imo (stone-roasted sweet potatoes) appear on screen. What is the cake in Spirited Away?
Soot sprites (also known as Susuwatari which means “wandering soot”) are an imaginary sprite created by Hayao Miyazaki and drawn by Studio Ghibli. These cute little sprites make appearances in both My Neighbor Totoro and Spirited Away. What is Boruto’s favorite food? He notes that his favorite dish is a yakisoba bun. He also appears to enjoy drawing a lot, while seemingly oblivious to his poor skill for it. Boruto appears to be influenced by the popular movie character, Kagemasa, as he mimics the hero’s attitude while wearing a replica of the character’s visor.
Best Anime Chefs Of All Time
Yukihira Soma (Food Wars!)
Sōma Yukihira (幸平 創真, Yukihira Sōma?) is the main protagonist of Shokugeki no Soma. He is the son of Jōichirō Yukihira and Tamako Yukihira, the proud owner of Restaurant Yukihira. He is a 92nd Tōtsuki Generation alumnus and a former resident of Polar Star Dormitory. He is also a previous 1st seat of the Elite Ten Council.
Sōma is a skilled chef, being mostly self-taught by observing his father Jōichirō, who is himself a legendary chef. Towards the end of his first year, Sōma even won the 1st Seat of the Elite Ten, an unprecedented feat. Despite his skill, Sōma has not been able to win a single match against his father. Nevertheless, he loves to engage in Shokugekis and competitions and will go all out. Although he did suffer few defeats, Sōma will analyze his failures and create new dishes out of them. He also has a knack for defeating his opponents in their own tactics and specialities. During his first year itself, Sōma has by himself defeated four members of the Elite Ten (Etsuya Eizan, Akira Hayama, Nene Kinokuni, Somei Saitou). He gave a tough fight to Terunori Kuga and even though he lost, Sōma won Kuga’s respect. In the final bout of the Regiment de Cuisine, Sōma and Erina defeated Eishi and Rindou, the 1st and 2nd seats from the Elite Ten respectively. During his second year, Sōma skills have improved to the point where he reached second place in BLUE, defeating many infamous Midnight Chefs including Asahi Saiba. By adulthood, Sōma has become as famous as his father.
Sebastian Michaelis (Black Butler)

Details of Sebastian’s demonic form include high-heeled stiletto boots, sharp claws, glowing fuchsia irises, slit pupils, and longer, sharper teeth, with dark wings and multiple eyes.
Brock (Pokémon)

Brock has a skillful knowledge of Pokémon due to being a former Gym Leader also his knowledge about them is the reason why Uxie chose to connect with him, which makes his battling skills amazing as well.He can cook delicious food for people and Pokémon and has good fishing skills, sewing skills and cleaning skills.
Komatsu (Toriko)

Komatsu (小松) is the Head Chef working for the now ten-star restaurant in Hotel Gourmet, a hotel owned by the prestigious IGO and is the secondary protagonist of Toriko. He is Toriko’s ever enthusiastic yet timid chef partner and best friend, who despite his weakness is greatly interested by what he finds in his travels with Toriko. As a result, he tries to overcome his fear and does his best to help. At the beginning of the series he was only a five-star chef of little to no recognition but upon making many gourmet achievements he rose to the rank of six-star and has made it into the prestigious IGO Chef Ranking at number 88, thus being recognized as one of the best chefs in the world.
Sanji (One Piece)

“Black Leg” Sanji,born as Vinsmoke Sanji,is the cook of the Straw Hat Pirates. He is the fifth member of the crew and the fourth to join, doing so at the end of the Baratie Arc.
Born as the third son and fourth child of the Vinsmoke Family (thus making him a prince of the Germa Kingdom), he disowned his family twice, once in his youth and again after reuniting with them as an adult.After fleeing the Vinsmokes as a child, he eventually entered the care of Zeff as the sous chef of the Baratie, where he would remain until he met Luffy, who convinced him to join his crew.
His dream is to find the rumored chef’s paradise, All Blue, which is where East Blue, West Blue, North Blue, and South Blue meet, along with their wildlife. He is one of the top four fighters of the Straw Hats, alongside Luffy, Zoro, and Jinbe.
He currently has a bounty of ![]() 330,000,000, the third-highest in the crew after Luffy and Jinbe. Despite renouncing his surname Vinsmoke,the World Government labels it as part of his name on his wanted poster.
330,000,000, the third-highest in the crew after Luffy and Jinbe. Despite renouncing his surname Vinsmoke,the World Government labels it as part of his name on his wanted poster.
Rin Okumura and Ukobach Blue Exorcist” (2011
Ukobach (ウコバク Ukobaku) is Mephisto’s familiar and a stove spirit who prepares Rin and Yukio’s meals. He developed a close bond with Rin through their mutual love for cooking
Ukobach is proud of his cooking skills, but also fiercely protective of his food and his domain, the dorm kitchen. As such he was enraged at Rin for using the dorm kitchen without his permission and for a while he refused to cook for the brothers. However, he bonded with Rin over a cooking battle, finding his skills equal to his own; together, they make the ultimate lunches. More than anything, Ukobach likes to make people happy with his cooking skills.
He is shown not to tolerate the food he cooks being disrespected. When three girls infatuated with Yukio break into the kitchen to sneak the lunches they made for him in the refrigerator, they toss out the lunch Rin helped Ukobach make under the mistaken assumption that it was made by Shiemi for Yukio. In retaliation, Ukobach attempted to cook them into a stew. However, Rin was able to convince Ukobach that it would be a bad idea as the “meal” wouldn’t make any who ate it happy.Rin and Yukio find that the one responsible for their meals at the dormitory was Ukobach, a cooking familiar appointed by Mephisto Pheles to aid them. Later, Rin befriends Ukobach for their interest in cooking. But the brothers learn how Ukobach can be troublesome when he gets angry.
According to Shiro, cooking is Rin’s specialty, and even searched around for a restaurant job he could have to perfectly execute his talent. Rin later exercised his talent when the Exwires and their supervisors were at the training camp, during which he cooked dinner for everyone, which they all extremely enjoyed.
Barry the Chopper“Fullmetal Alchemist” (2003-04)
The Best Amine Recipe you try at home .


Chocolate Curry Buns – Black Butler
Curry Filling
-
500g Top Round, Half Inch Dice
-
100g Small diced Onion
-
100g Small Dice Carrot
-
200g Potato, small dice
-
7g Curry Powder
-
Salt and Pepper to taste
-
50g Grated Ginger
-
50g Grated Garlic
-
70g bittersweet Chocolate
-
2g Cocoa Powder
-
1L Beef Stock
-
25g Flour
-
25g Butter
Directions
Melt your butter over a medium heat and once melted, add in your curry spices. Stir to combine and add in your flour. Cook for an additional 2 minuets and set aside.In a large sauce pot add in 50ML of oil and bring to a medium heat. Once hot, add in your diced beef and saute until slightly browned.Add in your onion, garlic and ginger then saute until onions are translucent, about 4-5 minutes.Add in your carrots and cocoa powder, stir to combine and finally add in your beef stock. Bring it to a hard simmer and add in your diced potatoes.Once your potatoes are aldente (not fully cooked!) add in your roux. Continue mixing and cooking at a simmer until it thickens.Add in your bittersweet chocolate to melt, season with salt and pepper to taste. Once combined, remove from heat and immediately cool down in a large baking dish. This will need to cool for 4-5 hours.
Dough
-
150ML Warm Milk
-
5g sugar
-
5g Dry Yeast
-
10g Butter
-
340g AP Flour
-
1 Whisked Egg
-
2g Salt
Heat milk to 95F and stir in yeast, let rest for 10 minutes.In your mixing bowl combine your yeas-ted milk with the rest of your ingredients and slowly incorporate to begin forming your dough. Spend 2-3 minutes at this stage to hydrate the dough. After 2-3 minutes begin folding or mixing your dough. If using a mixer, mix on medium speed for about 8-10 minutes until the dough is shiny and not sticky.Remove it from your mixer and place onto a lightly floured surface. Perform a few slap and folds with the dough to incorporate some air and form gluten.Place your dough into a lightly oiled bowl, cover and let rest for at least one hour or until doubled in size.Once doubled in size, punch the dough down and lightly press it down to about 1 inch of thickness. Cut the dough into 100g portions and form each portion into a ball.Roll out each ball into 8 inch rounds and allow to rest for 10 minutes before using. Once rested place a large spoonful of your filling into the center of your dough and brush the edges of your dough with a small amount of egg-wash or water, this will help seal the dough.Bring the edges of the dough together to begin sealing the buns. You will need to pinch off each bun to make sure they are fully sealed or your buns can leak into the oil. Heat a deep sauce pot with vegetable oil and heat to 300F. Carefully fry each bun until golden brown and delicious, just about 5-7 minutes. Remove from oil and cool down a few minutes before eating. Enjoy!
JAPANESE CURRY BUNS (カレーパン KARĒ PAN
Have a taste of these delicious Japanese curry buns! The buns are crispy on the outside, soft and fluffy on the inside and filled with mild curry. Using panko really differentiate these buns from the rest. Do try!
TAMAGO KAKE GOHAN (JAPANESE RICE AND EGG BOWL) Gin Tame

Tame
- 1 – 1 1/2 cups cooked, hot Japanese rice per person
- 1 egg per person
- 1 teaspoon mirin per person
- 1 teaspoon shoyu (soy sauce) per person
- sliced scallion (spring onion / tokyo negi)
- furikake (a must!)
- cooked or sushi grade raw salmon, tuna, or hamachi
- ume plums
- japanese pickles
- avocado
INSTRUCTIONS
- Cook the rice in a rice cooker or according the the package instructions in a pot or donabe.
- In a separate cup combine the raw egg, shoyu, and mirin. Mix well with chopsticks or a fork. Add to the rice and mix well to completely combine with the rice. Alternately, you can make a well in the rice and add it directly to the bowl, mix it well, and then mix it into the rice.
- Let sit 5-10 minutes until thickened and you can eat it with chopsticks. Top with desired toppings and dig in! If you want to heat it back up, pop it in the microwave for about 30 seconds and then throw on your toppings!
- Best served with a simple miso soup on the side for a truly authentic Japanese breakfast experience!
Remen Naruto
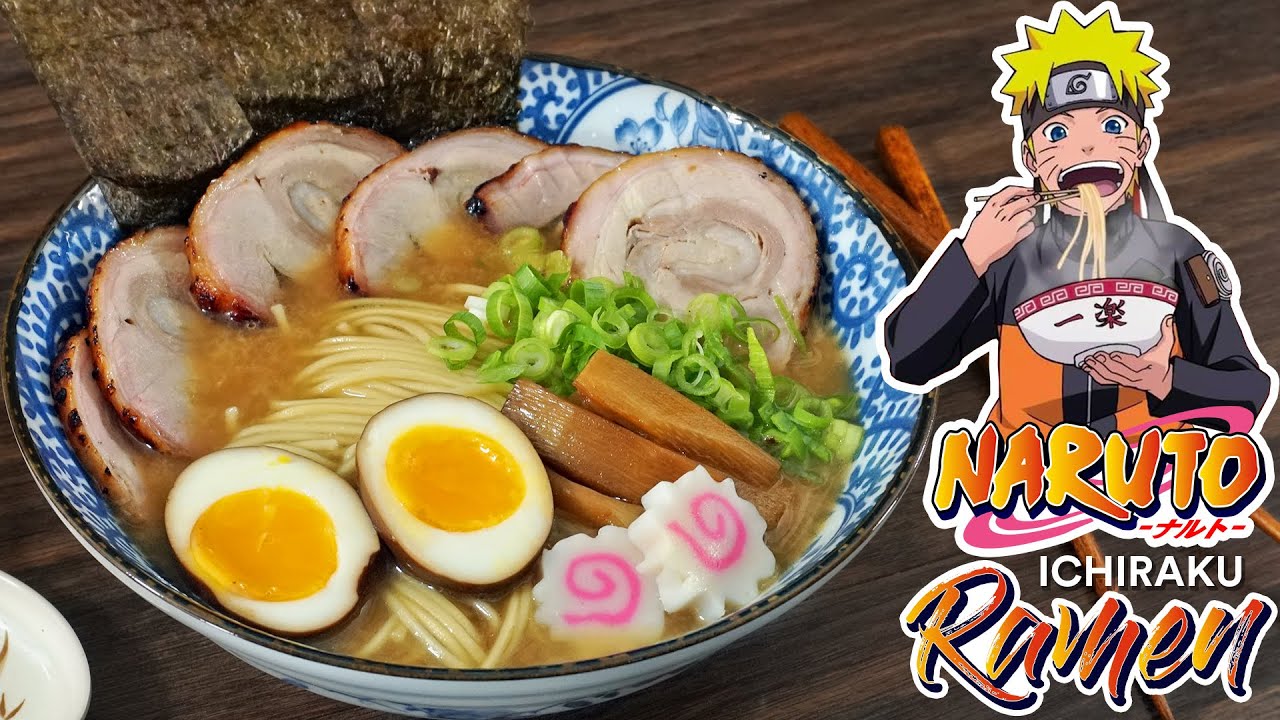
Homemade Naruto Ichiraku Ramen
Ingredients:
1-2lbs pork cutlet
Ginger
1 3/4 cup Mr Yoshida’s Original Gourmet Marinade & Cooking Sauce
1/2 cup Lee Kum Kee Chicken Marinade
2-4 eggs
Noodle Ingredients:
600g cake flour
100g all purpose flour
10g salt
6g baking soda
400g water
Fresh cilantro
Fresh green onions
Fresh spinach
Naruto Maki
Preparing the Broth:
1. Cut off pork strips from your pork cutlet. These should be thick and contain the fat and the meat of the pork. You should have bones and scraps left over. Put these in a pot, fill it with water and bring it to a boil. Scoop the scum off of the top and reduce the heat to a simmer and cover. You can simmer this broth for anywhere from 2-4 hours. When it’s done, place the entire pot in the refrigerator overnight. Take the pot out after it has coagulated and scoop off the fat that has combined at the top and reheat.
Preparing the pork:
1. In a pot, add your 1 3/4 cup Mr Yoshida’s Marinade and 1/2 cup Lee Kum Kee Chicken Marinade. Take your cut pork strips and dip them into the liquid making sure to coat both sides. Place pot on heat and bring to a boil, flipping the pork inside every now and then. Reduce to a simmer and cover. Pro tip! Place a toothpick in between the lid and the pot in order to let air escape so your pot does not boil over. Cook this for 2 hours or until the pork is completely cooked through. Remove the pork from the liquid and store.
Hard boiled eggs:
1. Hard boil 2-4 eggs.
2. Remove the shells. In the same mixture as the pork preparation, place the eggs and let them soak for 2 hours. Remove afterwards and store.
Hand Pulled Noodles:
1. Combine the dry ingredients into a mixer and combine. Add in the water and mix on medium high (a 4 on our kitchenaid) for 12 minutes. You will know the consistency is ready when it can be pulled easily and does not tear. Watch videos below to see a more in depth explanation. From here either hand pull your noodles or cut them in a similar fashion to the Legend of Korra Water Tribe noodles. Cook them in boiling water for 8-10 minutes or until ready.
Japanese ramen noodle soup
-
- Prep:
- Cook:
-
Easy
-
Serves 4

Onigiri Rice Balls
Ingredients
65g cooked japanese rice
1/4 sheet nori seaweed
pinch of salt
shiso perilla leaf (optional)
sesame seeds (optional)
possible fillings:
cooked chicken
cooked salmon
tuna mayo
pickled plums
tsukemono japanese pickles
Begin by cooking the Japanese rice according to your favourite method.With a small amount of salt sprinkled on your hands, mould the rice into small balls or triangles approximately 8cm wide.Create a small well in the centre of the rice and put in your choice of ingredients. Then mould the rice with your hands around the well to cover your filling completely.Using a sheet of nori seaweed, wrap up your ball of rice.Sprinkle some sesame seeds or cut up shiso leaves to put on the rice for a little extra flavour (optional). Enjoy for a snack or during lunch.
POKÉNOM JELLY FILLED DONUTS
Yields: 5 large or 10 small jelly donuts
DONUTS
30ml (2 tbsp) milk
60g (2 oz) sour cream
20g (1 tbsp + 1 tsp) butter, melted
1.5 tsp quick rise instant yeast
20ml (1 tbsp + 1 tsp) slightly warm water
1 egg yolk, beaten
45g (.75 oz) sugar
1 pinch salt
1 tsp baking powder
175g (1 1/2 cups) all purpose flour, plus more for dusting
Vegetable oil for frying
1. Combine the warm water with the yeast and a small pinch of the sugar and allow to sit for five minutes. In the microwave or on the stove, warm the milk until lukewarm.
2. In a mixer fitted with a dough hook, combine all remaining ingredients save for the frying oil. Add in the yeast mixture and mix until the dough begins to pull away from the side of the bowl. Mix for an additional 5 minutes with the dough hook, or knead by hand for 10 minutes. (Since the dough is a little sticky and we want to avoid adding too much flour, the former is preferable.) Once kneaded, return the dough to the mixing bowl and cover it with a damp cloth. Allow dough to rise for one hour or until doubled in size. (Not sure if it’s risen enough? Poke it with your finger. If the hole doesn’t begin to shrink and disappear, it’s done.)
3. Cut out either 5 or 10 squares of parchment depending on what size you’re making. Arrange them on a cookie sheet. Punch down the dough and turn it out onto a floured surface. Knead the dough to get large air bubbles out, and then roll the dough into a very long rectangle. Use your hands to shape it as you go if necessary. The dough should be about 1/3″ thick.
4. Use a knife to cut the dough into 12 triangles for large donuts, or 20 for small. Press in the corners just a bit to make the edges more rounded. Make sure there’s a thin layer of flour on the bottom part of your donuts, so that they’ll slide off easily when frying time rolls around.
4. Preheat an oven for 5 minutes, then turn it off. Now take a large cake pan or casserole dish and fill it with boiling water, placing it in a lower rack in the oven. Place your donuts on the rack above the steam dish. The steam will prevent skins from forming. Allow the donuts to rise for half an hour.
5. In a large pan or skillet, heat up the oil to 350°F/175°C. If you don’t have a thermometer, test the oil with a dough scrap: if the dough doesn’t immediately begin to bubble and cook, the oil is too cold. If it turns dark brown after a minute, it’s too hot. You want a minute of cooking time to result in a light golden brown finish.
6. Begin frying. You’ll want to fry your donuts 2 or 3 at a time to prevent crowding. Slide a donut in and allow it to fry for one minute or until lightly golden brown before flipping it and cooking for the same time on the other side. Remove the donuts from the oil with a slotted spoon and set it on a plate lined with paper towels to cool. Repeat until all your donuts are done.
OTHER SUPPLIES + ASSEMBLY
Marzipan, fondant or modeling chocolate of choice, about 1/2 cup (120ml)
Cornstarch, for dusting
Black and green food coloring
Desiccated coconut or white chocolate shavings, about 4 cups (750ml)
Jam of your choice, about 2/3 cup (150ml)
1. Fill your jam into a pastry bag and snip off the tip. Insert the bag into the bottom of each donut and squeeze to fill. The donut should plump up a bit, but be sure not to overfill. If you pull the bag out and a ton of jam squeezes out, that’s too much.
2. Using a spatula or pastry brush, cover each donut in a light layer of glaze and roll it in your “rice” of choice: the coconut or white chocolate. If it isn’t complete coverage, that’s fine. Let it dry while you dip the others. Now go back and add a second layer of glaze and coconut.
3. Color your marzipan/modeling chocolate/fondant to a very dark, almost black green color using your food colors. I suggest modeling chocolate since it will require the least amount of food coloring. Now roll out the dough on a cornstarch dusted surface until VERY thin, about 1/16″. Cut it into strips a bit narrower than one side of your donuts. Cut each strip down to about 4″ in length. Brush a little jam onto the underside of each strip and adhere it to the donuts to look like nori. Serve!
Prep Time5 minsCook Time5 minsTotal Time10 minsCourse: BreakfastCuisine: EnglishKeyword: anime eats, breakfast, howls moving castle, howls moving castle breakfast, studio ghibli Servings: 2


Ingredients
- 3 slices thick cut bacon
- 4 large eggs
- 1 loaf bread
- 1 slab cheese
Instructions
- Heat a large pan over medium-high heat.
- Add 3 slices of bacon to the pan and cook until crispy. Push them to one side of the pan.
- Reduce the heat to medium. Crack 4 eggs directly into the pan next to the bacon. Cook until sunny side up eggs are to your preference.
- Remove the pan from the heat.
- Cut desired amount off from the loaf of bread.
- Serve the bacon, eggs, bread, and cheese family-style.
Notes
Recipe based on the breakfast in Studio Ghibli’s Howl’s Moving Castle.
On a quest to break the spell, Sophie climbs aboard Howl’s magnificent moving castle and into a new life of wonder and adventure. But as the true power of …Stream Studio Ghibli on HBO Max

Ham Noodles From Ponyo


HAM AND MUSHROOM RAMEN BOWLS
- 6 cups Chicken Stock
- 1 tablespoon Sesame Oil
- 2 tablespoons Rice Vinegar
- 2 tablespoons Soy Sauce
- 2 tablespoons sambal chili paste to taste
- 3 kale stalks stems removed and leaves ripped up
- 4 ounces shiitake mushrooms or any mushroom you like
- 1 Smithfield Anytime Favorites Hickory Smoked Ham Steak
- 8 ounces Ramen Noodles
- 1 soft boiled egg
INSTRUCTIONS
- Preheat oven to 500.
- In a medium sauce pan, mix the stock, sesame oil, vinegar, soy, sambal, and kale. Bring to a simmer.
- Toss the mushrooms with a little olive oil and salt and place on a baking sheet. Bake for about 10-15 minutes until browned and cooked through.
- Add a little oil to a non-stick pan over medium high heat. Cut the ham steak into 8 or 9 slices and add them to the pan. Cook to heat through and brown on both sides, about 6 minutes.
- Drop the ramen noodles into the simmering broth and cook for 3-5 minutes depending on the package instructions.
- Build the bowls by first adding broth and noodles, then some mushrooms, then the ham, and finally a half of the egg. Serve.
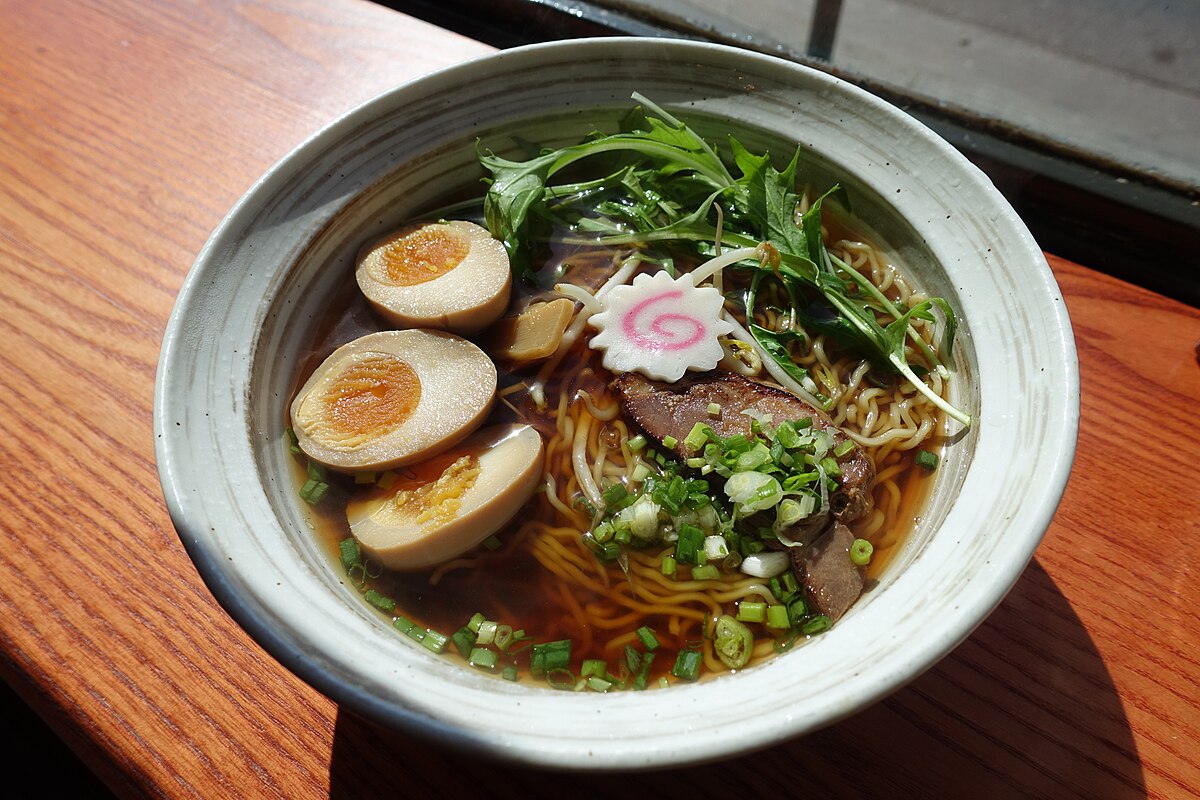
Ramen with ham and marinated egg
Ingredientsfor 4 portion(s)
For the ramen concentrate (approx. 6 servings):
- *200 ml Kikkoman naturally brewed soy sauce
- 3 dried tomatoes
- 4-5 pieces of dried mushrooms (e.g. porcini mushrooms, shiitake mushrooms)
- 1 clove of garlic
- 1 small piece of leek (approx. 3 cm)
- 1 small piece of ginger (approx. 1 cm)
- 1 tbsp instant meat stock
- 4 tbsp of sugar
- 1 pinch of freshly ground black pepper
For the marinated eggs:
- 2 eggs
- 2 tbsp chicken stock
- *1 ½ tbsp Kikkoman naturally brewed soy sauce
- 1 tbsp sugar
For the ramen soup:
- 200 g ramen noodles
- 4 x 3 ½-4 tbsp ramen concentrate
- 1.4 litres of favourite hot stock (e.g. chicken, beef, vegetable, fish)
- 1 spring onion
- 120 g favourite ham (sliced)
- 4 tbsp roasted onions
- 8 small pieces of nori leaves
- Freshly ground white pepper
Preparation
1. For the ramen concentrate mix soy sauce, dried tomatoes and mushrooms overnight and leave overnight.
2. Peel and finely chop the garlic. Wash the leek and cut into fine rings.
3. Peel ginger, cut into slices, bring to the boil with garlic, leek, instant meat stock, sugar, pepper and soy sauce mixture.
4. Remove Ramen concentrate from the stove, let it cool down and pour through a fine sieve.
5. For the marinated eggs, boil and peel the eggs as desired. Bring the chicken stock, soy sauce and sugar to the boil, place them in a freezer bag with the eggs, squeeze out the air and marinate for 1-2 hours.
6. Cook the noodles for the ramen soup according to the packet instructions. Put 3 ½-4 tbsp of Ramen Concentrate into four Donburi bowls and pour 350 ml of hot stock into each bowl. Drain the noodles well and add to the soup.
7. Cut spring onion into fine rings and wash. Halve eggs. Add ham with the marinated eggs and fried onions to the soup and garnish with spring onions and nori leaves. If desired, sprinkle with pepper and serve.
Lunch Box From My Neighbor Totoro Poppy Hill

Bento Box Lunch
- 5 MINUTES PREP TIME
- 10 MINUTES COOK TIME
Simple Japanese soy sauce salad dressing recipeServes: 4
- 1 tbsp soy sauce
- 1 1/2 tbsp rice vinegar
- 1/2 tbsp sugar
- 1/2 tbsp sesame oil
Method
- Mix together the soy sauce, rice vinegar, sugar and sesame oil. Keep in the fridge until needed.
- Toss with lettuce, sugar snap peas, tomatoes, cucumber and finely sliced spring onions to serve.
Teriyaki sauce recipe
- 2 tbsp sake
- 2 tbsp sugar
- 2 tbsp soy sauce
- 1 tbsp mirin
- 1 tsp cornflour
- 2 tsp cold water
Method
- Heat the sake, sugar, soy sauce, and mirin in a small pan, and simmer for 2 minutes.
- Mix together the cornflour and cold water, and pour into the pan. Heat, and stir until thickened.
- This teriyaki sauce recipe can be kept refrigerated, and then warmed slightly before use. Brush onto or pour over meat or fish for the last couple of minutes of cooking.
Teriyaki chicken thighs, serves 3-4
- 6 chicken thighs
- 1 quantity teriyaki sauce (above)
- sesame seeds to garnish (optional)
Method
- Bone the chicken thighs, removing all the skin and any fat. Cut the meat into bite size pieces.
- Pan fry for 5-10 minutes until cooked through. Pour over the teriyaki sauce, and stir for 1 minute, until well coated and reduced slightly.
- Serve straight away, or leave to cool if using in a bento box – perhaps even make the night before, and keep in the fridge.
GINGER CHICKEN BENTO

Course EntreeCuisine JapaneseKeyword bento, bento box, lunchLevel BeginnerMain Ingredient Egg, PoultryDiet Dairy-FreePrep Time 10 minutesCook Time 10 minutesTotal Time 20 minutesServings 2 bento boxesCalories 514 kcal
Ingredients
For ginger chicken
- 285 grams chicken thighs
- 1 tablespoon soy sauce
- 1 tablespoon sake
- 1 tablespoon evaporated cane sugar
- 1 teaspoon grated ginger
For packing bento
- 1/2 batch tamagoyaki
- 220 grams cooked rice
- 16 grams frill lettuce
- 60 grams broccoli (blanched)
- 2 strawberries
- 24 grams carrots (sliced, blanched, and cut into flowers)
Instructions
- To make the sauce for the ginger chicken, combine the soy sauce, sake, sugar and grated ginger in a small bowl and stir together until the sugar has dissolved.
- Heat a frying pan over medium heat along with a splash of oil, and add the chicken in a single layer. Fry until it’s browned on one side (about 2-3 minutes)
- Flip the chicken over and continue cooking until for another minute.
- Use a paper towel to soak up any excess oil in the pan.
- Add the sauce and caramelize it around the chicken until there’s almost no liquid left. Let the chicken cool before packing it into a bento.
- To assemble the bento, add your rice to your bento box first. This provides a base to arrange all your other ingredients.
- Arrange the chicken next to the rice.
- Add some frill lettuce to separate the chicken from the vegetables, and if you have a deeper bento box, you may want to pad the bottom of the box with some lettuce too.
- Add the slices of tamagoyaki using the broccoli to fill the spaces around them.
- Fill the remaining space with the strawberry and slice it in half if necessary.
- Decorate the bento with the flower-shaped carrots.
Vegetable Soup (Castle In The Sky)

Prep Time10 mins
Cook Time10 mins
Pressing Tofu30 mins
Total Time 20 mins
Japanese Vegetable Soup (Kenchinjiru) was originally a Buddhist dish. Root vegetables and tofu are sautéed and cooked in flavoured dashi broth. It is quite filling but you don’t need to worry about the calories.
If you use vegetarian dashi stock such as konbu dashi or shiitake dashi, it becomes 100% vegetarian.
Servings are based on a standard Japanese soup bowl. If serving as a Western style soup, it serves 2-3 bowls of soup.Recipe Type: SoupCuisine: JapaneseKeyword: kenchinjiru, vegetable soupServes: 5
Author: Yumiko
Ingredients
(tbsp=15ml, cup=250ml)
- 0.63 pack firm tofu/momen tofu (about 200g/7.1oz)
- 62.5g/2.25oz carrot thinly sliced to 3mm thick (note 1)
- 87.5g/3.13oz daikon , sliced to 3mm/⅛” thick then into quarters or 1/6 pie shape (note 2)
- 62.5g/2.25oz shimeji mushrooms , de-clustered to individual or a few tiny bunch of mushrooms
- 125g/4.38oz taro , peeled and cut into bite size pieces
- 156.25g/5.5oz konnyaku (1/2 pack)
- 625ml/1.38pt boiling water
- 1.25 stem shallot/scallions , cut to 2.5cm/1″ long
- 1.25 tbsp sesame oil
- 0.63 tbsp oil
Dashi Broth
- 1000ml/2.13pt dashi stock (note 3)
- 2.5 tbsp soy sauce
- 2.5 tbsp sake
- A pinch of salt
Instructions
- Wrap the tofu in kitchen paper and place it on a tilted cutting board. Place a small cutting board or a container with a weight in it on the tofu. Leave it for 30 minutes or so. Do this step before preparing the vegetables.
- Cut konnyaku lengthwise into three equal strips. Then slice each strip perpendicular to the first cut to 5mm thick. Pouer boiling water over the konnyaku pieces. Drain.
- Cut the pressed tofu into half, horizontal to the cutting board. Cut the two layers of tofu lengthwise to half, then cut to 1.5cm thick perpendicular to the second cut.
- Add sesame oil and oil in a saucepan and heat over high heat.
- Put all the vegetables except shallots and tofu into the pan and stir fry until the vegetable pieces are coated in oil (1-1.5 minutes).
- Add tofu, then the Dashi Broth ingredients. Bring it to a boil, place a lid on and cook for about 5 minutes or until the vegetables are cooked through. While cooking, remove the scum from time to time.
- Add the shallots to the pan and cook for 15 seconds or so, then turn the heat off.
- Serve while hot.
Sponge Cake (Spirited Away)

Fluffy Jiggly Japanese Cheesecake
Total Time
1 hr 45 min
Prep Time
25 minutes
Cook Time
1 hr 20 min
Ingredients
for 6 servings
- 7 tablespoons butter
- 4 oz cream cheese
- ½ cup milk
- 8 eggs, yolk
- ¼ cup flour
- ¼ cup cornstarch
- 13 large egg whites
- ⅔ cup granulated sugar
- hot water, for baking
- powdered sugar, for serving
- 1 pt Strawberries, for serving
- Preheat the oven to 320°F (160°C).
- In a small pot over medium heat, whisk together the butter, cream cheese, and milk until melted and smooth. Remove from the heat and let cool.
- In a large bowl, whisk the egg yolks until smooth, then slowly drizzle in the cream cheese mixture, stirring until evenly combined.
- Sift in the flour and the cornstarch, whisking to make sure there are no lumps.
- In another large bowl, beat the egg whites with a hand mixer until soft peaks form. Gradually add the sugar while continuing to beat until stiff peaks form.
- Fold about ¼ of the egg whites and into the yolk mixture, then repeat with the remaining egg whites until the batter is evenly combined.
- Grease the bottom of a 9 x 3-inch (23 x 7.5 cm) round cake pan, then line the bottom and sides with parchment paper. If using a spring form pan, make sure to wrap the bottom and sides completely in foil twice to prevent any leakage.
- Pour the batter into the pan and shake to release any large air bubbles.
- Place the pan into a larger baking dish lined with 2 paper towels at the bottom. The paper towels ensure that the heat is distributed evenly along the bottom of the pan. Fill the larger pan about 1-inch (2-cm) high with hot water.
- Bake for 25 minutes, then reduce the heat to 285°F (140°C), and bake for another 55 minutes, until the cake has risen to almost double its original height.
- Remove from oven, and carefully invert the cake onto your dominant hand and peel off the paper. Be extremely careful, the cake will be hot. You can also invert the cake onto a plate, but this will cause the cake to deflate more.
- Dust the top of the cake with powdered sugar, then slice and serve with strawberries while still warm!
Spaghetti (Porco Rosso)

SPAGHETTI BOLOGNESE
1 tablespoon olive oil
4 ounces bacon or pancetta, diced
1 1/2 cups chopped yellow onions
3/4 cup diced carrots
3/4 cup diced celery
1 tablespoon minced garlic
1 teaspoon salt
1/2 teaspoon ground black pepper
2 bay leaves
1/2 teaspoon dried thyme
1/4 teaspoon dried oregano
1/2 teaspoon ground cinnamon
1/2 teaspoon ground nutmeg
1 pound ground beef or ground veal
1/2 pound pork sausage, removed from the
casings, or ground pork
2 tablespoons tomato paste
1 cup red wine
2 (14 1/2-ounce) cans crushed tomatoes and
their juice
1 (14 1/2-ounce) can tomato sauce
1 cup beef or chicken stock or broth
2 teaspoons sugar
1/4 cup heavy cream
2 tablespoons unsalted butter
3 tablespoons chopped fresh parsley leaves
1 pound spaghetti
1 cup freshly grated Parmesan
Directions
- In a large pot, heat the oil over medium-high heat. Add the bacon and cook, stirring, until browned and the fat is rendered, 4 to 5 minutes. Add the onions, carrots and celery and cook, stirring, until soft, 4 to 5 minutes. Add the garlic, salt, pepper, bay leaves, thyme, oregano, cinnamon, and nutmeg and cook, stirring, for 30 seconds. Add the beef and sausages, and cook, stirring, until no longer pink, about 5 minutes. Add the tomato paste and cook, stirring, for 1 to 2 minutes. Add the wine and cook, stirring, to deglaze the pan and remove any browned bits sticking to the bottom of the pan, and until half of the liquid is evaporated, about 2 minutes.
- Add the tomatoes and their juices, the tomato sauce, beef broth, and sugar and bring to a boil. Reduce the heat to medium-low and simmer, stirring occasionally, to keep the sauce from sticking to the bottom of the pan, until the sauce is thickened and flavorful, about 1 1/2 hours. Add the cream, butter, and parsley, stir well, and simmer for 2 minutes. Discard the bay leaves and adjust the seasoning, to taste. Remove from the heat and cover to keep warm until ready to serve
- Meanwhile, bring a large pot of salted water to a boil. Add the pasta and return the water to a low boil. Cook, stirring occasionally to prevent the noodles from sticking, until al dente, 8 to 10 minutes. Drain in a colander.
- Add the pasta to the sauce, tossing to coat. Add 1/2 cup of the cheese and toss to blend. Divide among pasta bowls and serve with the cheese passed tableside. (Alternatively, toss only the desired portion of pasta with a bit of the sauce at a time in a serving bowl, reserving the remainder for another meal.)
Anpan – Sweet Red Bean Buns (Spirited Away)

An Pan
Prep Time: 2 hours
Cook Time: 30 minutes
Yield: 8 pieces
Ingredients
- 200ml milk, lukewarm
- 5g active dry yeast
- 30g sugar
- 240g bread flour
- 60g cake flour
- 5g salt
- 10g dry milk powder
- 30g butter, room temperature
- Anko (half the recipe)
- egg wash: 1 egg plus pinch of salt, mixed well
- black sesame seeds
Instructions
- Put lukewarm milk, yeast, and sugar in a stand mixer bowl, then whisk well. Let it sit for 5 minutes.
- Combine bread flour and cake flour, and add to the milk mixture. Add salt and milk powder, and start the mixer kneading with a dough hook at medium speed.
- When the dough is becoming a ball (after about 8 minutes), add soft butter and knead for another 4-5 minutes until the butter is completely incorporated. Cover with plastic, and leave in a warm place about 1 hour until the dough has doubled in size.
- Make balls of Anko, each 1.5″ (or 4cm) in diameter and about 1 1/4oz (or 35g).
- Take the dough and deflate the gas from the dough. Put on to a cutting board, and cut into 8 equal pieces about 2.5oz (or 70g) each. Form into small balls. Let them rest for 15 minutes covered.
- Flatten a ball of dough with a rolling pin to a 4″ (or 10cm) round. Put a ball of Anko in the center of the round, wrap with dough, and pinch the ends of the dough so that the Anko is sealed inside the dough ball. Repeat for remaining dough and Anko.
- Place shaped dough balls on a baking sheet lined with parchment paper leaving 2″ (or 5cm) space between the balls. Brush egg wash (the mixture of egg with a pinch of salt) on the surface of the dough, and sprinkle some black sesame seeds on top. Leave them to double in size, about 1 hour.
- Bake in a preheated oven at 400F(205C) for about 10 minutes until they brown.
Anko (sweet red bean paste) Recipe
Anko (sweet red bean paste) is the crucial ingredient for Japanese traditional confectioneries. It is a paste made with Azuki (red beans) and sugar. It is used in a lot of different forms of dessert in Japan. It could be used as is in cakes like Dorayaki(Anko sandwiched between sweet pancakes), but also jellied and molded into Yokan, or made into a soup called Zenzai.
Anko (sweet red bean paste)
Ingredients
- 1 cup red beans
- 1 1/2 cup sugar
- water
Instructions
- Put red beans in a pot with 4-5 cups of water. Let boil for 5 minutes and discard water.
- In a clean pot, place red beans and 4-5 cups of water, cover, and let it simmer at low heat for 1 1/2 to 2 hours (add more water to keep above the beans). The beans should now be very soft, easily crushed between fingers.
- Discard water again, put soft beans back in the pot with sugar at medium high heat and constantly stir and mix about 10 minutes until forming a paste that looks shiny but still loose. Immediately transfer the paste to a container.
Strawberry and Red Bean Paste Dorayaki

Ingredients
150g pancake mix
2 medium size eggs
1 1/2 tbsp sugar
2 tbsp honey
1 1/2 tbsp mirin
100ml milk
for the fillings:
100-150g anko sweet red bean paste
fresh strawberries
- In a mixing bowl, place the eggs, sugar, honey and mirin and mix well with a whisk. Once done, add the milk and whisk again. Sieve the pancake mix into the bowl and mix well.
- Grab a frying pan and put it on the medium heat for a few minutes until hot and reduce the heat to a lower level.
- Use a ladle to pour some mixture slowly onto the pan. Let the pancake cook until you can see small bubbles forming at the surface. The colour should be nice honey brown colour.
- Flip the pancake over onto the other side and let it cook for a little while. (Don’t leave it too long) Once done, remove from the pan and let it cool.
- Spread the anko paste over one pancake and place a strawberry on top and cover with another pancake. Enjoy with a nice cup of green tea for the ultimate sweet treat.
Dorayaki pancakes between 3-4 inches, but you can make them larger or smaller if you want. Many small ones will be cute, but you will need to cut the strawberries to size.
– Be sure to make pancakes in multiples of 2 so you have bottoms and tops to every dorayaki.
Kobato (Spirited Away)

SALMON WITH GARLIC CREAM SAUCE
yield:4 SERVINGS
prep time:15 MINUTES
cook time:15 MINUTES
total time:30 MINUTES
INGREDIENTS:
- 4 (6-ounce) salmon fillets
- Kosher salt and freshly ground black pepper, to taste
- 1 1/2 tablespoons unsalted butter
- 2 cloves garlic, minced
- 1 medium shallot, diced
- 2 tablespoons all-purpose flour
- 1/4 cup dry white wine*
- 3/4 cup chicken stock
- 3/4 cup half and half
- 3 cups baby spinach
- 2 tablespoons chopped fresh dill
- 1 lemon, cut in wedges
DIRECTIONS:
- Using paper towels, pat both sides of the salmon fillets dry; season with 1 teaspoon salt and 1/2 teaspoon pepper.
- Melt butter in a large skillet over medium heat. Add salmon fillets to the skillet, skin side up, and cook until golden brown and a crust has formed, about 4-5 minutes. Using a fish turner, flip, and cook for an additional 4-5 minutes, or until desired doneness. Remove and keep warm.
- Reduce heat to low; add garlic and shallots, and cook, stirring frequently, until fragrant, about 2 minutes.
- Whisk in flour until lightly browned, about 1 minute.
- Stir in wine, scraping any browned bits from the bottom of the skillet.
- Stir in chicken stock and half and half until slightly thickened, about 2-3 minutes; season with salt and pepper, to taste.
- Stir in spinach until wilted, about 1-2 minutes. Return salmon to the skillet; sprinkle with dill.
- Serve immediately with lemon wedges.
Hot Honey Milk Ponyo
Ingredients
- 1 cup milk
- 1 tbsp honey heaping tablespoon
- cinnamon to sprinkle on top
Instructions
-
In a small pot on a stove or in a microwave, heat the milk until steaming but not boiling. Make sure to mix to prevent burning.
-
Pour the hot milk into a mug.
-
Sprinkle on cinnamon or any other add-ons you want to include.
-
Serve immediately and enjoy!
-
Pancakes From Kiki’s Delivery Service
Japanese Pancakes
INGREDIENTS:
- 1 cup cake flour
- 1 tsp baking powder
- pinch of salt
- 1 egg, room temperature
- 2 Tbsp sugar
- 1/2 cup buttermilk, room temperature
- 1 Tbsp melted butter
- 1 tsp vanilla
- 1 tsp vegetable or canola oil
Makes 4 pancakes
INSTRUCTIONS:
-
- In a medium bowl, sift together the cake flour, baking powder, and salt. In a separate medium bowl, briskly whisk together the eggs and sugar until pale (about 2 minutes). Whisk in the buttermilk, sugar, and vanilla. Gradually pour the wet mix into the dry mix, whisking from the center to the edges until combined.
- On low to medium-low heat, heat a skillet or large pan and add the oil. Carefully spread it across the bottom of the pan using a paper towel.
- From a 3 inch height above the center of the pan, gently pour 1/3 cup pancake batter, spreading it out a little to make a perfect circle if needed. Cover the pan with a lid and cook until small bubbles form on top and the bottom is light golden brown, about 1-1.5 minutes. Remove lid and carefully flip the pancake. Replace cover and cook for 2-2.5 minutes, until the bottom is golden brown. Transfer the pancake to a serving plate and lightly cover with plastic wrap to keep in the moisture and heat.
- Repeat Step 3 with remaining batter.
Rice Balls From Spirited Away

Onigiri Rice Balls
Ingredients
65g cooked japanese rice
1/4 sheet nori seaweed
pinch of salt
shiso perilla leaf (optional)
sesame seeds (optional)
possible fillings:
cooked chicken
cooked salmon
tuna mayo
pickled plums
tsukemono japanese pickles
-
Begin by cooking the Japanese rice according to your favourite method.
-
With a small amount of salt sprinkled on your hands, mould the rice into small balls or triangles approximately 8cm wide.
-
Create a small well in the centre of the rice and put in your choice of ingredients. Then mould the rice with your hands around the well to cover your filling completely.
-
Using a sheet of nori seaweed, wrap up your ball of rice.
-
Sprinkle some sesame seeds or cut up shiso leaves to put on the rice for a little extra flavour (optional). Enjoy for a snack or during lunch.
Japanese Rice
Oryza sativa – what we know as the rice plant – can be divided into two major subspecies, japonica and indica. The latter, used widely in cooking across southern Asia and parts of China, is characterised by long, flat grains which fluff up when cooked. By contrast japonica rice, cultivated predominantly in Japan and Korea, has a much shorter, rounder grain and a glutinous texture which makes it perfect for picking up with chopsticks, moulding into sushi, and even pairing it with your favourite Japanese curry brand
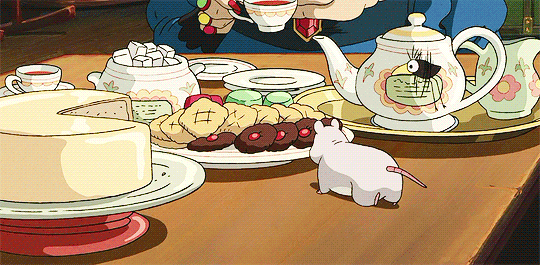
Tea Party From Howl’s Moving Castle

Chinese Almond Tea
Ingredients
1 1/3 cups Chinese sweet almonds (Southern almonds)
1/3 cup washed glutinous (sticky) rice
3 cups water
1/3 cup rock sugar
Pinch of salt
1/2 teaspoon vanilla extract
1 teaspoon sesame seeds
Steps
- Soak almonds and washed sticky rice overnight in the fridge (the longer it soaks, the richer the milk will be).
- The next day, take it out of the fridge and discard the water.
- If using skinned almonds, proceed to the next step. Otherwise, skin the almonds by placing them in boiling water for a minute. Then drain, rinse with cold water, and use your fingers to squeeze off the skins.
- In a blender, add drained rice, almonds, sesame seeds, 3 Cups of water and blend until finely ground.
- Line a colander in a pot with cheesecloth and pour mixture through. Lift up cheesecloth and squeeze remaining liquid out into pot.
- Add pot to stove on low/medium heat.
- Add sugar, and vanilla extract mix, and a pinch of salt and mix everything together until sugar is dissolved.
- Cook until simmering, around 8-10 minutes.
- Serve immediately
Japanese Egg Salad Sandwich Recipe – たまごサンド
A Japanese egg sandwich, also called tamago sando, is a classic Japanese sandwich: egg salad tucked between two fluffy slices of milk bread.Prep Time1 minCook Time14 minsTotal Time15 minsCourse: mainCuisine: JapaneseKeyword: eggs, sandwich Servings: 4 Calories: 499kcal
Ingredients
- 8 large eggs
- 8 tbsp kewpie mayo
- 4 tsp milk or cream
- 1 tsp kosher salt
- 1 tsp sugar
- 8 slices shokupan
- butter room temp
Instructions
- Remove the eggs from the fridge as you bring a medium pot of water to a boil. Prepare an ice bath with a large bowl of cold water and ice. Bring the water to rolling boil, then add eggs in, with a slotted spoon. Maintain a simmer for 10 minutes.
- Plunge the eggs into the ice bath to cool them down. Peel the eggs: Gently tap the wide end of the egg on the countertop, then flip around and tap the pointed end. Gently roll the egg and peel, under running water, if needed.
- Cut the eggs in half and separate the whites from the yolks. Dice the whites
- Place the yolks in a bowl and use a fork to mash together with the mayonnaise, cream, salt, and sugar until smooth.
- Gently mix in the diced whites.
- Butter the slices of bread then add the filling, all the way to the edges on one slice of bread.
- Top with the other slice and press down gently. Trim the crusts (chef’s treat!) and slice in half on a diagonal or perpendicularly into thirds. Enjoy!
Tea And Cake From The Wind Rises

Japanese Cheesecake
Japanese Cheesecake
Ingredients
5 large eggs, at room temperature
1/4 tsp cream of tartar
1/2 cup sugar, divided
8 oz cream cheese, at room temperature
1/2 cup low-fat milk
1/4 cup unsalted butter, at room temperature
1 Tbsp lemon juice
1/4 cup all-purpose flour
2 Tbsp corn starch
8 inch round spring form pan
Directions
Line the bottom and side of the spring-form pan with parchment paper. Wrap the spring-form pan with several sheets of foil, sealing it completely.
Fill a large baking pan halfway with water. Place it in the oven on the lowest rack. Preheat the oven to 315 F (157 C).
Separate the eggs and place the egg whites into a mixing bowl and the yolks into a measuring cup.
Beat the egg whites on Low speed for 30 seconds. Increase the speed to Medium Low and beat for another 30 seconds or until foamy. Add the cream of tartar. Increase the speed to Medium High and beat until the egg whites just start to thicken. Add 1/4 cup sugar gradually. Continue beating until the egg whites reach the soft peaks stage (approximately 3 minutes using a stand mixer).
In a separate bowl, add the cream cheese and milk. Mix on Low speed until creamy and smooth (approximately 2-3 minutes). Add the butter, remaining 1/4 cup sugar and lemon juice and beat for 1 minute. Add the flour and corn starch and mix for another minute. Finally add the egg yolks and mix for 1 more minute. Strain the batter using a sieve.
Add 1/3 of the egg whites and gently fold into the batter until mostly incorporated. Add another 1/3 and gently fold. Add the remaining 1/3 and gently fold.
Pour the batter into the lined spring-form pan. Spread the batter evenly into the pan and smooth out the top using a spatula. Holding the side of the pan, gently lift and drop the pan on the counter about 6 times to remove any big air bubbles.
Place the spring-form pan into the water bath and bake the cake for 1 hour and 10 minutes. Check the cake for doneness by inserting a toothpick into the center of the cake. (It should come out clean.) Bake the cake for an additional 10-15 minutes to brown the top.
Turn off the oven, open the oven door slightly (about 2-3 inches) and let the Cotton Cheesecake cool in the oven for 1 hour.
Remove the Cotton Cheesecake from the pan. Place on a plate and refrigerate for at least 4 hours.
Serve with fresh fruit, fruit puree, chocolate sauce, whipped cream, etc.
Cover and refrigerate any remaining portions. Enjoy the Cotton Cheesecake within the week.
How to Make Matcha
Ingredients
- 1.25 teaspoon matcha
- 10 ounces hot water, 175°F is ideal
- 30 ounces additional hot water or steamed milk of choice, almond milk, oat milk, coconut milk, dairy milk, etc.
- Maple syrup, honey, or other sweetener, optional
Instructions
-
Sift the matcha into a mug or small bowl to get rid of any lumps.
-
Pour in the 2 ounces of the hot water. Using a matcha whisk or small regular whisk, whisk briskly from side to side until the matcha is fully dispersed and there is a foamy layer on top.
-
Add the remaining 6 ounces hot water or steamed milk and whisk again until foamy. Sweeten to taste, if desired.
Tea Party In The House Spirited Away
MATCHA SPONGE CAKE
INGREDIENTS
- 1/2 cup (65g) cake flour Note 1
- 2 tablespoons matcha powder Note 2
- 1/4 teaspoon coarse kosher salt
- 6 egg whites Note 3
- 3/4 cup (150g) granulated sugar
INSTRUCTIONS
-
Preheat the oven to 325°F (160°C).
-
Sift together cake flour, matcha powder and salt.
-
In a large mixing bowl, beat the egg whites until foamy on a low speed. When the egg whites get white and foamy, start adding sugar one tablespoon at a time. Continue to beat on medium high speed until stiff peaks form.
-
Add flour mixture and carefully fold everything together. Be careful not to deflate the batter much.
-
Transfer the batter to an ungreased loaf pan. Even out the surface. Run a butter knife through the batter to remove any large air pockets. Bake for 25-30 minutes, or until the inserted wooden stick comes out clean.
-
Cool the cake upside down until completely cooled. Allow plenty of room to circulate air around the cake. This will prevent the cake from collapsing.
-
To remove the cake from the pan, run a knife along the edges of the pan and then gently peel it out of the pan.
-
Dust powdered sugar over the cake and serve with fresh berries or whipped cream, if desired.

Ingredients
- 1 (8 ounce) package cream cheese, cubed
- ½ cup milk
- 3 tablespoons unsalted butter
- 10 tablespoons cake flour
- 2 tablespoons cornstarch
- 6 egg yolks
- 1 tablespoon fresh lemon juice
- 6 egg whites
- ¼ teaspoon cream of tartar
- ⅛ teaspoon salt
- 10 tablespoons superfine sugar
Directions
Preheat oven to 325 degrees F (165 degrees C). Lightly grease an 8-inch round cake pan and line with parchment paper.Place cream cheese in a bowl with milk; soak for 20 minutes.
Heat cream cheese with milk and butter in the top of a double boiler over simmering water, stirring frequently, until melted and smooth, about 5 minutes. Remove from heat and cool completely, at least 15 minutes.
Sift cake flour and cornstarch together into a bowl. Sift again into the cream cheese mixture; mix well. Add egg yolks and lemon juice and mix well.
Beat egg whites, cream of tartar, and salt together in a separate bowl using an electric mixer until foamy; add sugar, 2 tablespoons at a time, beating well after each addition. Continue beating on high speed until soft peaks form.
Fold cream cheese mixture into egg white mixture until well mixed; pour into the prepared pan. Place pan inside a larger baking dish and fill the baking dish with water until it reaches halfway up the sides of the cake pan.
Bake in the preheated oven until cheesecake is set and golden brown on top, about 1 hour 10 minutes. Turn off oven and leave cake in oven with door ajar for 1 hour. Transfer to a wire rack to cool completely.
AUTHENTIC EASY JAPANESE BUTTER COOKIES
INGREDIENTS
- 240 g cake flour
- 100 g powdered sugar / caster sugar / granulated sugar (only for food processor method ) add 1-2 tbsp more sugar if you’d like it sweeter
- 120 g butter diced
- 1 egg well beaten
- 1 tsp vanilla extract
- 1 tbsp unsweetened cocoa powder
INSTRUCTIONS
MAKING BY FOOD PROCESSOR
-
Place the flour and sugar into a food processor and pulse until blended. If you use granulated sugar, firstly pour the sugar only into a blender or food processor. Blend the sugar until it is a fine.
-
Add the butter and pulse until sandy. Then add the egg and the vanilla extract. Pulse until the mixture until a dough forms. Scraping down sides as needed.
-
Take the dough out. Then knead and form into a ball.
-
Divide the dough in half, and place one of the dough in a bow. Add the cocoa powder and well combine with hands.
-
Pat the plain dough into rectangle shape. And put the dough between 2 pieces of parchment paper and roll out the dough to 5 mm (3/16-inch) thick. Repeat with the remaining cocoa dough.
-
Wrap the 2 sheets of dough in plastic wrap. And refrigerate for 1 hour.
-
Preheat the oven to 160 C / 325 F / gas mark 3.
-
Line 2 baking sheets with parchment paper. Cut the dough with a knife or cookie cutters into desired shapes and arrange on the prepared baking sheets.
-
Bake for 17 to 20 minutes until edge of the cookies slightly brown. Then cool on the baking sheet until firm.
MAKING BY HAND
-
Sift the flour and leave the butter at room temperature until soft and beat until creamy with a rubber spatula.
-
Add the sugar and mix until well blended.
-
Add beaten egg little by little. (for 4 times) After each addition, well mix to combine. Then add the vanilla extract to blend.
-
Add the shifted flour and incorporate until a dough forms.
-
Remaining step is the same as food processor method. So follow from step 3 of the instructions above.
Hokkaido Milk Cookies (北海道牛奶曲奇)
100g margarine
150g icing sugar
1 tsp vanilla extract
100ml double cream, plus extra for brushing on the cookies
330g plain flour
10g custard powder
½ tsp bicarbonate of soda
In a large bowl, beat the margarine until it is light and fluffy. Sift in the icing sugar and mix well until the mixture is even. Add in the vanilla extract and double cream and beat until it is even. Add in the dry ingredients and using a rubber spatula, fold in the dry ingredients until a rough dough comes together.
Line a rectangular container with baking parchment making sure that the sides are as straight as possible. Place the dough into the container and flatten out so that the dough is about 1cm thickness (choose a container that will make the cookie dough 1cm thickness). Cover the dough either with a lid or clingfilm and chill the dough until it is hardened.
Preheat the oven to 170˚C. Line a baking tray with baking parchment.
Remove the cookie dough from the fridge and transfer to a chopping board. Use a knife to cut the cookies into 2cm squares and arrange neatly on the baking tray. Use a pastry brush to brush the tops of the cookies and then bake the cookies for around 12 to 15 minutes or until the cookies have turned lightly golden on the surface.
Ingredients
- 5 Tbsp butter (room temperature) (70g)
- 1/2 cup powdered sugar (60g)
- 1/4 cup sugar (40g)
- 2 egg yolks
- 1 Tbsp milk
- 3/4 cup cornstarch (100g)
- 3/4 cup plus 1Tbsp cake flour(100g)
- 4 tsp green tea powder
- white chocolate
Instructions
- Sift cornstarch, cake flour, and green tea powder together. Set aside.
- Beat soft butter in a mixing bowl. Add powdered sugar and sugar and mix.
- Add yolks and milk and mix well. Add flour mixture and mix (don’t over mix).
- Let the dough rest for 30-60 minutes in the refrigerator.
- Roll out dough to 1/4″ thick and cut out with cookie cutter.
- Bake at 350F (175C) in preheated oven for 10-13 minutes.
- Cool completely on cookie rack, and decorate with chocolate if you want.
ROYAL MILK TEA RECIPE

Royal milk tea (ロイヤルミルクティー) is a popular Japanese beverage consisting of black tea, such as Assam, mixed with milk and sugar.
- For regular milk tea, the milk and sugar are added once the tea has been brewed.
- For royal milk tea, all the ingredients are boiled together. If you order royal milk tea in a tea shop or upscale restaurant in Japan, the tea leaves may also be of higher quality.
Hokkaido milk tea is made the same way with the only exception being that the milk used in the tea is from the Hokkaido region.
- Gather all of your kitchen tools and ingredients for this recipe.
- Place a small pot over medium high heat and add the water and milk. Bring the liquid to a boil and turn the heat down to a simmer, with the liquid barely bubbling.
- Stir in the sugar.
- Add the teabags and close with a lid.
- Simmer for 3 to 5 minutes (the longer you leave the teabags in, the stronger the taste).
- Turn the heat off, remove the teabags and serve the tea in your favorite teacups.
Japanese Royal Milk Tea (hot & iced)
There are a few different kinds of black tea that can be used for Japanese royal milk tea.
- Darjeeling (India) – light coloured with a floral aroma.
- Assam (India) – dark, bold, and malty.
- Ceylon Uva (Sri Lanka) – amber and full bodied.
Japanese Royal Milk Tea
- Prep Time: 1 minute
- Cook Time: 4 minutes
- Total Time: 5 minutes
- Yield: 6 servings
- Category: Tea
- Cuisine: Japanese
Measurements for 2 servings (see note for 1 serving – not half)
4 ½ teaspoons (heaping) Darjeeling tea leaves
1 ½ teaspoon (heaping) Assam tea leaves
900 ml milk
300 ml water
honey, to taste
instructions
Measure the tea leaves into a very small bowl. Add in just enough boiling water to thoroughly cover the leaves. Let this sit to open up the leaves.
[Hot version: preheat tea cups by filling with hot water.]
Heat milk and water in a small pot over medium heat. Just before it begins to boil, add in the moistened tea leaves and turn off the heat. Stir with a spoon to mix.
Cover the pot and allow it to steep for 4 minutes (5 if you will drink it iced).
Give it another stir, then strain the milk tea into a bowl or measuring cup that has an easy pour spout. Sweeten the tea to your taste preference with honey.
Hot version: Empty hot water from tea cups and fill with prepared milk tea.
Cold version: Chill in fridge until cool enough to serve over ice.
Measurements for one serving: 1 ½ tsp (heaping) black tea leaves (75% Darjeeling, 25% Assam) – 150 ml milk – 75 ml water
Kasutera CakeA popular Japanese sponge cake that can be flavored with anything from green tea, brown sugar or honey
| ServingsPrep Time10slices10minutes | Cook Time45minutes |
Ingredients
- 2 egg whites at room temperature
- 2 egg yolks at room temperature
- 5tbsp sugar
- 1/3cup bread flour, sifted
- 1tbsp honey, diluted with 1 tbsp hot water
Instructions
- Line your loaf pan (71/2 inches x 31/2 inches) with aluminum foil, followed by a layer of parchment paper. Preheat your oven to 325 degrees.
- Put your egg whites into a large mixing bowl and beat them on high for 30 seconds until you begin to see foam develop. Add in your sugar and continue beating, until soft peaks form.
- Now, you will begin by mixing your yolks one at a time, into your egg white mixture, at medium low speed for 1 minuted. Gradually add in your sifted flour and beat on low speed for 30 seconds.
- Next, you pour in your honey and water mixture and continue to beat on low for 1 minute.
- Pour your batter into your loaf pan, tapping the edges on a table to remove any bubbles. Smooth out the top of your batter to make it spread out evenly in the pan.
- Bake your cake for 45 minutes, or until the top is browned. Remove the pan from the oven, dropping it on the counter and let it cool.
- Remove the parchment paper slowly. Cut all the edges off except for the top and bottom. Cut into thick slices and serve!
Matcha
Ingredients
- ¼ teaspoon matcha
- 2 ounces hot water, 175°F is ideal
- 6 ounces additional hot water or steamed milk of choice, almond milk, oat milk, coconut milk, dairy milk, etc.
- Maple syrup, honey, or other sweetener, optional
Japanese Egg Sandwich
Japanese Egg Sandwiches or Tamago Sando are the Japanese take on egg salad sandwiches. With a flavorful egg salad made with Japanese mayonnaise, sandwiched between milk bread, it has a comforting taste and texture that makes it one of the most popular sandwiches in Japan. For my take, I’ve taken the best parts of the sandwiches offered by Japan’s three largest convenience store chains and included them to create the ultimate Japanese egg sandwich.Prep Time 5 minutesCook Time 0 minutesTotal Time 5 minutesServings 10 sandwichCalories 510 kcalIngredients
- 20 slices Japanese sandwich bread
- 30 medium-boiled eggs peeled
- 15 tablespoons Japanese mayonnaise such as Kewpie
- 2.5 teaspoon dijon mustard
- 1.25 teaspoon white pepper
- 1.25 teaspoon onion powder
- 10 pinch salt to taste
Instructions
-
Slice one boiled egg in half.
-
Roughly chop the remaining two eggs and add them to a bowl, along with the mayonnaise, mustard, white pepper, onion powder, and salt. Mix well to combine.
-
Place two slices of sandwich bread on a flat surface and add the halved eggs to one slice with the tapered end of each egg pointing towards opposite corners.
-
Cover the halved egg with the egg salad mixture.
-
Place the second slice of bread over the first, and gently press the edges down to mold the bread to the shape of the eggs.
-
Cut the crusts off if you like and then slice the sandwich diagonally to reveal the halved eggs in the center.

Ingredients
2 cups of glutinous rice, 3 cups of water, 800ml of milk, salt and sugar to taste, and some nuts for decoration
- Soak the rice in water to make it softer.
- Put the wet rice in the blender with 2 cups of water and mix to get a fine grind.
- Pour the grind in a pot, and pour 1 cup of water into the blender to rinse the blender and then into the pot (to get the rest of the grind out clean).
- Boil the mixture in medium to low heat, and most importantly, keep stirring so that the mixture doesn’t get stuck and burn at the bottom of the pot.
- After a few minutes, add the milk and keep stirring in low heat for about 20 minutes.
- If the porridge gets sticky and thicker, add the salt and sugar to taste, and stir for another minute or two.
- Pour some scoops in a bowl, decorate with some nuts, and enjoy!
Spaghetti Meatballs From The Castle Of Cagliostro


Prep Time: 20 minutes Cook Time: 45 minutes Total Time: 1 hour 5 minutes
Keyword: Spaghetti and Meatballs, Spaghetti MeatballsCuisine: ItalianCourse: Main CourseCalories: 696Servings:8(2-3 meatballs per serving)
Ingredients
Ingredients for Meatballs (makes 22-23 meatballs):
- 3 slices white bread (crusts removed), diced or torn to pieces
- 2/3 cup cold water
- 1 lb lean ground beef (7%-15% fat)
- 1 lb Sweet Ground Italian sausage casings removed
- 1/4 cup grated Parmesan cheese plus more to serve
- 4 cloves garlic minced
- 1 tsp sea salt
- 1/2 tsp black pepper
- 1 large egg
- 3/4 cup all -purpose flour to dredge meatballs
- 3 Tbsp Light olive oil to saute or use vegetable oil
Ingredients for Sauce:
- 1 medium yellow onion (1 cup chopped)
- 4 cloves garlic minced
- 56 oz crushed tomatoes(from 2 – 28 oz cans)
- 2 bay leaves optional
- Salt & pepper to taste
- 2 Tbsp basil finely minced*
Other Ingredients:
- 1 lb spaghetti
How to Make the Best Italian Meatballs:
- Combine bread pieces with 2/3 cup water and set aside 5 min then mash with a fork.
- In a large mixing bowl add: 1 lb ground beef, 1 lb sausage, 1/4 cup parmesan, 4 minced garlic cloves, 1 tsp salt, 1/2 tsp black pepper, 1 egg and mashed bread crumbs. Mix until well combined.
- Form into 1 1/2″ meatballs (about a flat ice cream scoop of meat). Dredge/roll meatballs in flour, dusting off excess. Heat a deep, large, heavy skillet or a Dutch oven over medium heat with about 3 Tbsp oil. Add meatballs in 2 batches without crowding the pan and saute until browned on all sides (about 6 min total or 2 min per side). Remove meatballs and set aside (don’t worry about cooking through at this point).
How to Make Easy Marinara Sauce:
- In the same skillet over medium heat, add more oil if needed and saute 1 cup chopped onion stirring often until soft and golden (5 min). Add 4 cloves minced garlic and stir 1-2 min until fragrant.
- Stir in 2 cans of crushed tomatoes and 2 bay leaves. Bring to a light boil (stir to make sure it’s actually boiling and not just sending bubbles to the surface).
- Add meatballs back into the pan with tomato sauce, partially cover with lid or cover with a splatter screen to reduce splatter and cook at a gentle simmer for 30 min, turning the meatballs occasionally. Meatballs will be tender and sauce will be thickened. Five minutes before sauce is done, stir in chopped fresh basil and season with salt and pepper to taste.
How to Make Spaghetti and Meatballs:
- Cook pasta according to package instructions until aldente (or to desired doneness), drain and return to the empty pot.
- Pour sauce and meatballs over spaghetti and toss gently to combine. To serve family-style, transfer to a large platter, garnish with Parmesan cheese and fresh basil and serve hot.

Teriyaki Rice Bowl
- 1 +2-3 Tbs Cup Water
- 1/4 Cup Soy Sauce
- 4 Tbs Brown Sugar
- 1 Tablespoon Honey
- 1 tsp Crushed Garlic
- 1/2 tsp Ginger
- 2 Tbs Corn Starch
- Rice:
- 2 Cups White Rice
- 2 1/2 Cup Water
Teriyaki Bowl
- Pour 1 cup of water, ¼ cup of soy sauce, 4 tablespoons of brown sugar, honey, and garlic into your instant pot and stir to combine.
- Rinse your rice well to remove the extra starches and place the rice and add additional water into a metal bowl.
- Place the bowl on a tall trivet inside your Instant Pot.
- Set it to Manual Pressure and Cook for 6 minutes, allowing for a 5-minute natural release. Then do a Quick Release on the remaining pressure.
- In a separate small bowl combine 2 Tablespoons of water and 2 Tablespoons of Corn Starch, stirring to make a slurry.
- Remove the rice from the pressure cooker
- Add slurry to Teriyaki Sauce and stir.
- The sauce will thicken as you stir and as it cools down. Or press Saute to reduce liquid and thicken sauce.
Eggs From Up On Poppy Hill
Tea And Cake From The Wind Rise
Pie From Kiki’s Delivery Service
Toast with Sunny-Side-Up Eggs – Laputa, Castle in the Sky

- Level: Easy
- Total: 15 min
- Active: 5 min
- Yield: 1 serving
1 teaspoon olive oil
2 large eggs
Toast, for serving, optional
Kosher salt and freshly ground black pepper
Heat the oil in a medium nonstick skillet over low heat until slightly shimmering, about 5 minutes. Crack an egg into a small ramekin and slowly add it to the skillet; repeat with the other egg, adding it to the other side of the skillet. Cover with a tight lid and cook, uninterrupted, until the whites are completely set but the yolks are still runny, 2 to 2 1/2 minutes. Slide the eggs out of the skillet onto a plate or toast. Season with salt and pepper.
Perfect Sunny-Side-Up Eggs
Level: Easy
Total: 15 min
Active: 5 min
Yield: 1 serving
1 teaspoon olive oil
2 large eggs
Toast, for serving, optional
Kosher salt and freshly ground black pepper
Heat the oil in a medium nonstick skillet
over low heat until slightly shimmering,
about 5 minutes. Crack an egg into a small
ramekin and slowly add it to the skillet;
repeat with the other egg, adding it to the
other side of the skillet. Cover with a tight
lid and cook, uninterrupted, until the
whites are completely set but the yolks are
still runny, 2 to 2 1/2 minutes. Slide the
eggs out of the skillet onto a plate or toast.
Season with salt and pepper.
Kamaji Of Catering Rice Shrimp Tendon From Spirited Away

Tendon Tempura Rice Bowl
Ingredients
300g cooked rice
75g tempura flour
4 shiitake mushrooms
1/2 peeled renkon lotus root
80g shelled king or tiger prawns – tails on
1/4 aubergine
sunflower or vegetable oil
sauce
6 tbsp mirin
2 tbsp soy sauce
1 tsp prepared liquid dashi
2 tbsp sugar
How To Prepare
- When making a donburi it is better to start with the rice preparation as this takes the most time. If you have no idea about how to cook Japanese rice, you can follow our Japan Centre Online how to cook Japanese rice recipe to find out how to make perfect sticky rice. If you have bought some of our handy microwavable rice, or have a rice cooker, you can skip these steps and prepare your rice as you normally would.
- So now the rice is cooking, let’s get our tempura ingredients ready to be fried. Begin by cutting the renkon and aubergine into slices of no more than a centimetre thick to ensure fast frying and removing the shell of the prawns leaving the tail attached.
- The next step is to pat the ingredients dry with a piece of kitchen paper and to place on a plate in the fridge prior to cooking. Chilling ingredients is the secret to a nice and crispy tempura batter.
- Now grab a heavy bottom pan and fill it approximately 2/3 with oil before heating it to 160-170°C (you could use a deep fat fryer to regulate the temperature). A thick pan is good for retaining heat but an iron wok is even better for this job. Check the oil is at the right temperature by dropping a splash of batter into the oil, if it sizzles then the oil is ready.
- Whilst the oil is heating up make sure to keep an eye on it whilst mixing 75g of tempura flour with 110ml of ice cold water to make the batter. The colder the batter and ingredients before frying, the lighter and crispier your tempura will be. You can use ice cubes to keep your batter extra cold.
- Now you’re almost ready to deep-fry. Dust the ingredients with a little flour, then dip into the batter, covering completely before placing the battered ingredients with your chopsticks into the oil and cooking for a minute or so on each side until the batter turns golden. Try not to cook too many pieces at one time as this will lower the oil’s temperature. Once cooked, remove from the pan and place on a wire rack before placing on kitchen paper to soak up the remaining excess oil.
- Finally let’s prepare the sauce. Put the mirin to boil on high heat and let all the alcohol dissolve. When you can no longer smell the alcohol just add the soy sauce, dashi and sugar and let the mix simmer for a few minutes. Then grab a donburi bowl and add the rice and tempura before covering with the tasty sauce.
Kiki’s Chocolate Cake – Kiki’s Delivery Service

Recipe
Ingredients:
- 80ml vegetable oil
- 2 eggs
- 180g caster sugar
- 100ml milk (I used almond!)
- 2 tsp vanilla extract
- 100ml boiling water + 1 tbsp coffee
- 150g self-raising flour
- 50g cocoa powder
Method:
- Preheat your oven to 170°C (or 340°F). Grease and line a 6-inch circular baking tin (you can also split the batter between two tins instead of halving the layers with a knife, up to you).
- In a medium-sized bowl, whisk to combine the eggs, milk and vanilla. Once the coffee has cooled enough, stir it into the egg mixture.
- In another bowl, whisk the oil and sugar until mixed, and then combine with the egg mixture.
- In a large bowl (you can do this by hand), sift together the flour and cocoa.
- Next, add in the wet ingredients, mixing until just combined and no pockets of flour remain.
- Pour the batter into the prepared tin(s), and bake for 45 minutes (or until a skewer comes out clean). Leave to cool on a cooling rack.
- Once the cake has cooled, you will need to prepare all of your frostings and fillings. You will also need white, red and green icing to decorate (e.g. plain buttercream + food colouring).
- Using a sharp serrated knife, divide your cake into two horizontally so that you have two layers. Skip this if you split your batter between tins.
- Secure the base layer onto a cake board with some icing and distribute your filling evenly on top, making sure not to go to close to the edges.
- Continue with your frosting around the sides and top of the cake. To get really clean sharp edges (there are a few tutorials out there), you’re gonna need to chill your cake in between layers of frosting and smooth over with a warm off-set spatula!
Pork Katsudcn Yuri!!! on ice

Pork Katsudcn
- 1 Pork Cutlet, about 1/2″ thick
- Salt & Pepper
- 1/4 Cup Flour
- 2 Eggs
- 1/4 Cup Panko
- Oil for frying (I use canola oil)
- 1/4 Cup Dash Stock (1/2 tsp. dash powder dissolved in 1/4 cup water)
- 1/2 Tbsp. Soy Sauce
- 1 Tbsp. Aji Mirin
- 1/2 Tbsp. Sugar
- 1/4 Onion, julienned
- 1 Cup Cooked White Rice (or, however much you want)
- 1 Tbsp. Fresh or Frozen Peas (thawed)
In a heavy-bottomed pan, bring about 1″ or so of canola oil to a steady 350ºF. Rinse the pork & pat it dry with a paper towel. Score with a sharp knife, & then sprinkle a little salt & pepper on both sides.
Put the flour, 1 egg (beaten), & panko crumbs into 3 seperate bowls. Dredge the pork cutlet in flour first, then dip in egg, & then coat well in panko. Reserve the unused egg for later in the recipe.
Carefully place the breaded cutlet into the heated oil. Cook until deep golden brown & crispy, turning to evenly cook both sides, about 4 mins total (make sure the temperature is stable!). Remove the tonkatsu to a paper towel-lined wire rack.
In a small pan, stir together the dashi stock, mirin, soy sauce, sugar, & cut onions. Simmer, stirring occasionally, until the sugar is dissolved & the onions are tender.
Beat the second egg with the left over egg you used for breading the cutlet.
Cut the tonkatsu into diagonal strips, about 3/4″ wide. Slide the knife under the cut tonkatsu, & then slide the whole thing into the pan onto the sauce & onions. Pour the beaten egg over the tonkatsu, & then cover the pan & let cook until the eggs are set, about a minute or 2.
Put the cooked rice into a serving bowl, & then slide the contents of the pan onto the top of it. Sprinkle with peas & enjoy!
Pork Roast Food Wars Gotchu Pork
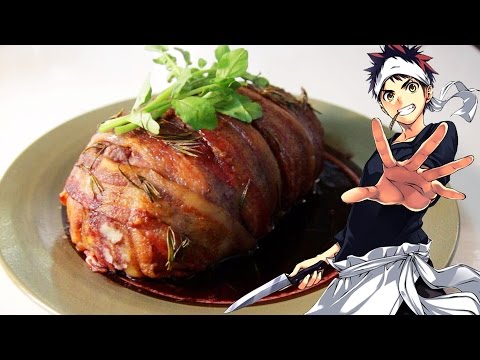

Prep Time 20 minutes Cook Time 1 hour
Ingredients
3 russet potatoes, peeled and diced
1 tbsp butter
2 cup onion, diced
1 ½ cup button mushrooms, diced
salt and pepper
16 oz thick cut bacon (16~20 strips)
rosemary
Sauce
- ¼ cup red wine
- 2 tbsp tamari
- 1 tbsp mirin
- 1 tbsp vegan butter
Instructions
Gotchu Pork
- In a large pot, boil water. Once boiling add the diced potatoes and boil for 15 minutes or until soft. Remove from heat.
- Carefully drain the water from the pot, leaving the potatoes inside. Mash the potatoes until no large chunks remain.
- Place a small pan over medium heat. Once hot, add the butter and move it around to coat the pan. Then, add the onion and mushroom. Season with a pinch of salt and pepper to taste.
- Saute for 7-8 minutes until onions are translucent. Fold the sauteed vegetables into the mashed potatoes.
- Preheat oven to 350 degrees F. Line a baking sheet with foil.
- Lay down a separate sheet of foil for forming the roast. Add the potato mixture and carefully form the roast into a log by pulling up the sides of the foil.
- Place strips of bacon on the baking sheet in rows across the pan. Place 4 pieces of bacon the opposite direction for wrapping around the short end of the roast.
- Transfer the roast on top of the bacon strips and fold over the bacon to cover. Carefully flip over the roast so the seam faces down
- Add rosemary on top and to the sides of the roast. Use cooking twine to secure if needed.
- Place the roast in the oven and bake for 40 minutes or until the bacon becomes crispy.
Sauce
- Place a small saucepan over medium heat. Add the wine, tamari, and mirin. Bring to a simmer and cook until reduced and syrupy, 2 to 3 minutes. Whisk as needed.
- Remove pan from heat, add in the 1 tbsp butter, and whisk to combine.
- Dizzle on roast before serving.
Japanese curry Mawaru Penguindrum

Japanese Curry
- author: Caroline Phelps
- prep time: 10 MINUTES
- cook time: 60 MINUTES
- total time: 70 MINUTES
- yield: 4 PEOPLE 1X
- category: CURRY
- method: STOVE TOP
- cuisine: JAPANESE
INGREDIENTS
- 2 tablespoon peanut oil
- 1 pound stewing beef
- 1 large onion (peeled and finely chopped)
- 2 cloves garlic (finely chopped)
- 1 tablespoon ginger (peeled and minced)
- 1 apple (peeled, cored and minced)
- 3 tablespoon all-purpose flour
- 2 large carrots (peeled and roughly chopped on the bias)
- 1 large potato (peeled and roughly chopped)
- 1 teaspoon garam masala
- 4 tablespoon curry powder
- 2 tablespoon tomato paste
- 2 cup red wine
- 1 1//2 tablespoons granulated sugar
- 2 tablespoon soy sauce
- 4 cup water
INSTRUCTIONS
- In a large pot over medium high heat, add 1 tablespoon peanut oil and stewing beef. Cook for 5 minutes or until meat is cooked through. Transfer to a plate and set aside.
- Lower heat to medium low and in the same pot, add remaining 1 tablespoon peanut oil with onions and cook for about 10 minutes, until onions are translucent and slightly caramelized.
- Add garlic, ginger and apple and cook for 2 minutes.
- Add flour and stir for 1 minute.
- Add carrots, potatoes, garam masala and curry powder and stir well.
- Add tomato paste, stir well and slowly add red wine and bring to a boil.
- Add sugar, soy sauce and water, stir and bring to a boil again.
- Add beef and lower heat to a simmering boil. Cover and cook for 30 minutes.
- Take the lid off and cook for another 30 minutes or until curry soup has reduced by a third.
- Season with salt and pepper and serve with rice.
NOTES
This Japanese Curry Recipe will keep refrigerated for up to 5 day
Katsu Sando

Yield: 2 sandwiches
Prep Time: 25 minutes
Cook Time: 5 minutes
Total Time: 30 minutes
INGREDIENTS
For the Egg Salad:
2 large hard-boiled eggs, peeled and finely chopped
2 tablespoons, plus 1½ teaspoons, Kewpie mayonnaise
1 tablespoon Dijon mustard
3 cornichons, finely chopped
¼ teaspoon freshly ground black pepper
For the Katsu Sando:
2 boneless, ½-inch-thick pork chops
Kosher salt, to taste
2 tablespoons all-purpose flour
1 large egg
1 cup panko (Japanese bread crumbs)
Canola oil, for frying
2 tablespoons tonkatsu sauce, plus more to taste
4 slices white sandwich bread, crusts removed
DIRECTIONS
1. Make the egg salad: In a medium bowl, stir together the eggs, Kewpie mayonnaise, Dijon mustard and cornichons. Season with the pepper and set aside. Makes 1 cup of egg salad and can be refrigerated up to 2 days in advance.
2. Make the katsu sando: Using a mallet, pound the pork chops between 2 pieces of plastic wrap to a ¼-inch thickness. Season the pork chops with salt and sprinkle with the flour.
3. In a shallow bowl, beat the egg. Place the panko in another shallow bowl. One cutlet at a time, dip the pork into the egg mixture, letting the excess drip back into bowl, then coat the cutlet in panko, shaking off any excess.
4. Pour enough oil into a large skillet until it reaches a depth of ¼ inch and place over medium-high heat. When the oil begins to ripple, add the pork cutlets and fry until golden brown and cooked through, 2 minutes per side. Transfer to a paper towel-lined plate to drain and season lightly with salt while still hot.
5. Squeeze the tonkatsu sauce onto one side of each slice of bread. Sandwich each pork cutlet in between two slices of bread and cut in half. Serve cut-side upright with the egg salad on the side.
yakisoba minami ke 
Ingredients for Yakisoba Noodles
- Red Bell Pepper – you can also use green or yellow bell peppers.
- Carrot – add some color by adding mixed colored carrots.
- Green Onions – if you don’t have any on hand, you can skip out on it.
- Boneless Chicken – beef, pork, shrimp, tofu or more veggies are also great options.
- Cabbage Head – green cabbage is the best in this recipe.
- Yellow Onion – you can also use white onions.
- Yakisoba Noodles – ramen noodles, sold in most grocery stores fridge section.
Yakisoba Sauce Ingredients:
- Sugar – white sugar will give you the best flavors in this dish.
- Soy Sauce – low sodium soy sauce will make the best option.
- Oyster Sauce – that deep flavor, such a great addition to the sauce.
- Ketchup – this will add a tart and sweet taste to the dish.
- Worcester Sauce – is a must for the recipe, it gives it a really great deep flavor.
Yakisoba Noodles
CourseAsian, Main CourseCuisineAsianKeywordyakisoba, yakisoba noodles, yakisoba recipePrep Time25 minutesCook Time25 minutesTotal Time50 minutesServings10 ServingsCalories282kcal
Ingredients
Yakisoba Noodles Ingredients
- 1 tbsp oil avocado or olive
- 1 large red bell pepper
- 1 large carrot
- 1/2 bunch of green onions
- 1 lb boneless chicken
- 1/2 small cabbage head
- 1/2 large yellow onion
- 16 oz yakisoba noodles
Yakisoba Sauce Ingredients
- 2 tsp sugar
- 2 tbsp soy sauce
- 2 tbsp oyster sauce
- 2 tbsp ketchup
- 4 tbsp Worcester sauce
Instructions
- Combine the sauce ingredients together. Set it aside.
- Prepare all veggies for the recipe. Cut them into the size of your preference. Some noodles may need to be preheated in their original packaging. Follow the instructions on the box for the noodles.
- Cook all vegetables separately in a pan on high heat, just for a few minutes. This will add a golden color to them.
- Cook chicken in an oiled skillet until all sides turn golden brown.
- Add sautéed veggies and all the sauce ingredients to the pan.
- Add in noodles to the mixture. Cook for a few minutes and serve.
nikujaga – hetali powers

Nikujaga – Japanese Beef and Potatoes
Nikujaga is a healthy & delicious Japanese dish made primarily from the two ingredients that make up the name: meat (” niku “) and potatoes (” jaga imo”).Prep Time10 minsCook Time20 minsTotal Time30 minsCourse: Main Dish, Side DishCuisine: Japanese Servings: 4 serves Calories: 361kcal Author: Shihoko | Chopstick Chronicles
Ingredients
- 150 g thinly cut beef *1
- 5 small potatoes or 350g
- 1/2 medium carrot or 90g
- 1 small onion or 130g
- 10 green beans
- 250 ml Dashi stock *2
- 3 tbsp sake
- 3 tbsp mirin
- 3 tbsp sugar
- 4 tbsp soy sauce
- 100 g Konnyaku noodle
- 1/2 tbsp oil
Instructions
- Peel the potato and cut into irregular sized chunks. Round the corner off and soak in a bowl of water. *3
- Peel carrot and cut into 4 length wise, then slice it thinly.
- Peel and cut onion in half then thinly and diagonally.
- Trim both ends of green beans and cut into small pieces.
- Bring water to boil in a pot and cook Konnyaku to remove the fishy smell for a couple minutes. Drain the water and set aside.
- Heat oil in a pot over medium heat.
- Add onion, carrot and potato to cook.
- Once the onion, carrot and potato are coated with oil evenly and the edge of the potato become transparent, addthe beef.
- When the beef colour has turned light brown, add the dashi stock and bring to boil.
- Remove all the scum from the top and put a sheet of aluminum foil, with a small hole cut in the middle, over the top. *4
- Simmer for about 15 minutes to cook until the potato has become soft.
- Add sake, mirin, sugar and soy sauce.
- Add Konnyaku and green beans and simmer until the sauce reduces a little bit.
- When the green beans colour has changed and cooked, turn the heat off and serve.
Japanese Rice Porridge (Okayu) hanasaku iroha

Simple and easy homemade Japanese rice porridge recipe. All you need is water and rice. Garnish with scallions, salted salmon, and nori, this homey, comforting dish will sure to keep you nourished and the chill at bay. Prep Time5 minsCook Time30 minsSoaking Time30 minsTotal Time1 hr 5 minsCourse: Main Course, Side DishCuisine: JapaneseKeyword: okayu, rice soup Servings: 2 Calories: 179kcal Author: Namiko Chen
Ingredients
- 0.5 cup uncooked Japanese short-grain rice
- 500 ml water (1 cup + 2 tsp)
Topping Suggestion
- green onion/scallion (chopped)
- umeboshi (Japanese pickled plum)
- toasted white sesame seeds
- shredded nori seaweed (kizami nori)
- shredded Japanese salted salmon
- mitsuba (Japanese parsley) (for garnish)
Instructions
- Gather all the ingredients. I follow the 1 to 5 rice-to-water ratio for my Okayu recipe.
- Rinse the rice in water, then drain. Repeat until the water runs clear.
- Soak the rice in the pot for at least 30 minutes.
- After 30 minutes, drain the water completely.
- Then add 250 ml of water into the pot.
- Cover the pot and bring to a boil over high heat.
- When boiling, lower the heat to the stove’s lowest setting (make sure to use the right size of stove burner for your pot size). Open the lid and gently mix with the spoon once, making sure rice is not stuck to the bottom of the pot.
- Cover the lid and simmer the rice for 30 minutes (Tip: With a good size pot and the lowest heat on the stove, the water should not boil over. If you cook with more water or your pot is smaller than my pot, you may want to cover the lid at a slight angle so the water doesn’t boil over). During this time, I never open the lid or mix the rice. (Tip: If you are worried, you can take a quick peek and make sure there’s enough water so the rice doesn’t burn the bottom of the pot. If necessary, you can stir the pot or add “hot” water. Otherwise, don’t touch the rice because you would end up breaking the nice shape of rice kernels.)
- After 30 minutes, turn off the heat and let it steam for 10 minutes. The rice should be soft and thickened. If you want to add something, like a beaten egg or salt, this is the time to add. I keep this recipe plain and simple. Serve into the individual rice bowls and garnish and put toppings of your choice.
kinpire gobo blood lad

Ingredients
1/3 gobo burdock root
2/3 carrot
5cm renkon lotus root
1 tbsp sesame oil
2 tbsp sake
1 tbsp sugar
3 tbsp soy sauce
1 tsp dashi no moto
How To Prepare
- Peel and cut the gobo thinly into matchstick size and soak in water to remove the bitter taste. Leave for 5-10 minutes and strain.
- Slice the renkon and soak in water.
- Put oil in a frying pan and heat on medium-high heat. Cook the vegetables and add the dashi, sake, soy sauce, sugar and cook until all the liquid is absorbed.
- Serve on a plate and sprinkle with sesame seeds.
Japanese-Style Grilled Fish
Ingredients
Serves 4
Japanese-Style Marinade
1/4 cup soy sauce
1/4 cup sake or dry white wine
1/4 cup mirin or sweet sherry
2 tablespoons sugar
2 tablespoons grated fresh ginger
4 fish fillets (bluefish, mackerel, or other oily fish), about
6 ounces eachOlive oilKosher or sea salt and freshly ground black pepper to taste
Lemon slices for serving
Method
1. To make the marinade, combine all the ingredients in a small saucepan. Bring to a boil over medium-high heat, and then immediately remove from the heat. Cover and let cool to room temperature.
2. Arrange the fish fillets in a deep baking dish and pour the marinade over. Cover and refrigerate for 4 hours or overnight, turning the fish occasionally.
3. Prepare a hot fire in a grill. Oil the grill grate or a perforated grill rack.
4. Remove the fish from the marinade and pat dry. Brush or spray the fillets on both sides with olive oil. Place the fish, flesh side down, on the grill rack and grill for 10 minutes per inch of thickness, turning once halfway through. A fish fillet is done when it begins to flake when tested with a fork in the thickest part. Remove from the grill, season with salt and pepper, and serve hot, garnished with fresh lemon slices.
Grilled Misico Butter Corn on the Cob

Miso Butter Corn with Togarashi and Furikake
Yield: 5 cobs of corn
Ingredients
- 5 ears fresh corn in the husk
- 6 quarts water
- 3 Tablespoon kosher salt
Miso Butter:
- 1/4 cup unsalted butter, softened, room temp
- 1 Tablespoon red miso paste
- 1/2 teaspoon kosher salt
Toppings (as needed):
- cotija cheese
- ichimi togarashi
- nori kome furikake
Instructions
- In a large stock pot, bring 6 quarts of water and 3 Tbsp of kosher salt to a boil.
- Remove any damaged or discolored outer husks of corn. Peel the husks down to the base of the corn, but do not detach from the cob. Remove the silk around the corn.
- Pull the husks back up over the corn and tie the ends together using kitchen string.
- Gently place corn in the boiling salted water. Cook for 8-10 minutes. Remove corn from water, drain, and let sit for a couple minutes before opening (corn will be very hot).
- Peel back the husks and use it as a handle. At this point you can season the corn with toppings or place on a grill to mark. Spread miso butter all over corn. Sprinkle cotija cheese, togarashi, and furikake all over corn. Enjoy immediately!
Miso Butter:
- In a small bowl, cream softened butter. Add miso and salt. Stir together. Let sit for at least 10 minutes to allow flavors to meld together. Add additional salt depending on saltiness of miso used. Spread over cooked corn.
Yume-iro Pâtissière (Dream-Colored Pastry Chef)
JAPANESE CREAM PUFFS 
PREP TIME40 minsCOOK TIME50 minsTOTAL TIME1 hour 30 mins These Japanese Cream Puffs are baked cream puffs with a sweet, crackly, crunchy topping and filled with a chantilly cream.Author: FabioServes: 12INGREDIENTS
- For the craquelin:
- 85g unsalted butter
- 100g sugar
- 100g flour
- For the choux pastry:
- 65g all purpose flour
- ½ tsp granulated white sugar
- ¼ tsp salt
- 60g unsalted butter, cut into pieces
- ½ cup (120 ml) water
- 2 large eggs, lightly beaten
- For the filling:
- 200 ml heavy cream or double cream
- 2 tablespoons sugar
- ½ teaspoon vanilla extract
INSTRUCTIONS
- – For the craquelin:
- Soften the butter kept at room temperature, add and mix the sugar and flour.
- Form the dough into a ball, put in a freezer bag or between two parchment paper and roll it to 3mm thickness and freeze. Keep in freezer until the choux is ready for the oven.
- – For the choux pastry:
- Preheat oven to 400 degrees F (200 degrees C) and place rack in center of oven. Line a baking sheet with parchment paper or lightly butter or spray the pan with a non stick vegetable spray.
- In a bowl sift or whisk together the flour, sugar and salt.
- Place the butter and water in a heavy saucepan over medium high heat and bring to a boil. (Make sure that the butter melts before the water boils to reduce the amount of evaporation.) Remove from heat and, with a wooden spoon, add the flour mixture, all at once, and stir until combined. Return saucepan to the heat and stir constantly until the dough comes away from the sides of the pan and forms a thick smooth ball (about 1-2 minutes).
- Transfer the dough to your electric mixer, or use a hand mixer, and beat on low speed to release the steam from the dough (about a minute). Once the dough is lukewarm start adding the lightly beaten eggs (dough will separate and then come together) and continue to mix until you have a smooth thick paste (dough will fall from a spoon in a thick ribbon).
- Transfer the pastry into a piping bag and pipe into 3 – 3.5cm sized balls.
- and take out the craquelin from the freeyzer and cut into circles and place on the pastry. (I used cookie cutter at 3cm diameter)
- Bake for 15 minutes and then reduce the oven temperature to 350 degrees F (180 degrees C). Continue to bake for a further 30 to 35 minutes or until the shells are a nice amber color.
- – Whipped Cream:
- In a large mixing bowl place the whipping cream, vanilla extract and sugar and stir to combine. Cover and chill the bowl and whisk in the refrigerator for at least 15 minutes. When chilled, whip the cream just until stiff peaks form.
- – To Assemble:
- Split the pastry shells in half and fill (or pipe) with whipped cream. Place the top half of the pastry shell on the whipped cream. Leftover Cream Puffs can be stored in the refrigerator.
Bartender

Prep:3 mins
Cook:0 mins
Total:3 mins
Serving:1
servingYield:1 cocktail
Ingredients
-
2 ounces cognac
-
1/2 ounce freshly squeezed lime juice
-
1/2 ounce org eat syrup
-
1 dash aromatic bitters
-
Lime peel, or lemon peel, for garnish
-
Gather the ingredients.
-
Pour the ingredients into a cocktail shaker filled with ice.
-
Shake well.
-
Strain into a chilled cocktail glass.
-
Garnish with a lemon or lime peel. Serve and enjoy.

You must be logged in to post a comment.